
開発を進める中で、アプリ名の正式決定や変更に伴い、パッケージ名を変更したいことがあると思います。
一番最初に flutter create でプロジェクト作成した際に、最終的な名前で設定するのが最も楽なのすが、私の場合はアプリもバックエンドも開発した後にアプリ名の変更をしてしまったため、手順を書き残します。
ディレクトリ名の変更
普通にPC上のファイル名を手動で変更。
次に、ファイル名変更によりパスが変わるので、エディタ(VS CODE)上でimport文のパス(import ‘package:xxx/~~~’;)にエラーが出たため、検索機能で一括置換します。
PC上では、気づいたら旧フォルダ名と新フォルダ名の2つのファイルが発生してました。Git系の事象かも?ちなみにGithubへのコミットは、ディレクトリ名が変わっても問題なく行えました。
アプリ名の変更
旧アプリ名称でエディタを検索し、順に新アプリ名に置換していきます。変更したのは以下のファイル。パッケージ名は全て小文字、アプリの表示名は大文字から始まることに注意します。
※アプリの表示名は小文字でもエラーにはなりませんが、世の中のアプリ名のほとんどは大文字始まりです。
※(これは私だけかもしれません)firebase/google cloudのプロジェクト名を旧アプリ名称にしていたのですが、プロジェクト名は変更できないため、firebase/google cloud関連の設定ファイルのprojectIdを間違えて書き換えてしまわないように注意が必要でした。
※書き換え不要なもの(自動生成・置換がされるファイル)があればコメントで教えてください!
pubspec.yaml ※これはパッケージ名なので、小文字にしないとエラーになる
name: dayby
description: "A new Flutter project."
publish_to: 'none'

# 略README.md
# Dayby

A new Flutter project.

## Getting Started

This project is a starting point for a Flutter application.

<!-- 略 -->.vscode/launch.json ※VSCODE上での表示名なので大文字でも小文字でもOK
{
    "version": "0.2.0",
    "configurations": [
        {
            "name": "dayby",
            "request": "launch",
            "type": "dart",
            "program": "lib/main.dart",
            "args": [
                // "-d",
                // "chrome",
                // "--web-port",
                // "5000"
            ]
        },
        {
            "name": "web-server",
            "request": "launch",
            "type": "dart",
            "program": "lib/main.dart",
            "args": [
                "-d",
                "web-server"
            ]
        },
        {
            "name": "dayby (profile mode)",
            "request": "launch",
            "type": "dart",
            "flutterMode": "profile"
        },
        {
            "name": "dayby (release mode)",
            "request": "launch",
            "type": "dart",
            "flutterMode": "release"
        },
    ]
}android/app/src/main/AndroidManifest.xml ※表示名なので大文字
<manifest xmlns:android="http://schemas.android.com/apk/res/android"
    xmlns:tools="http://schemas.android.com/tools">
    <application
        android:label="Dayby"
        android:name="${applicationName}"
        android:icon="@mipmap/ic_launcher"
        android:enableOnBackInvokedCallback="true">

<!-- 略 -->android/app/build.gradle
// 略

android {
    namespace "com.hamxxxxi.dayby"
    compileSdk flutter.compileSdkVersion
    ndkVersion "26.1.10909125"

// 略

    defaultConfig {
        applicationId "com.hamxxxxi.dayby"
        minSdkVersion 23
        targetSdkVersion flutter.targetSdkVersion
        versionCode flutterVersionCode.toInteger()
        versionName flutterVersionName
    }

// 略android/app/src/main/kotlin配下のディレクトリ
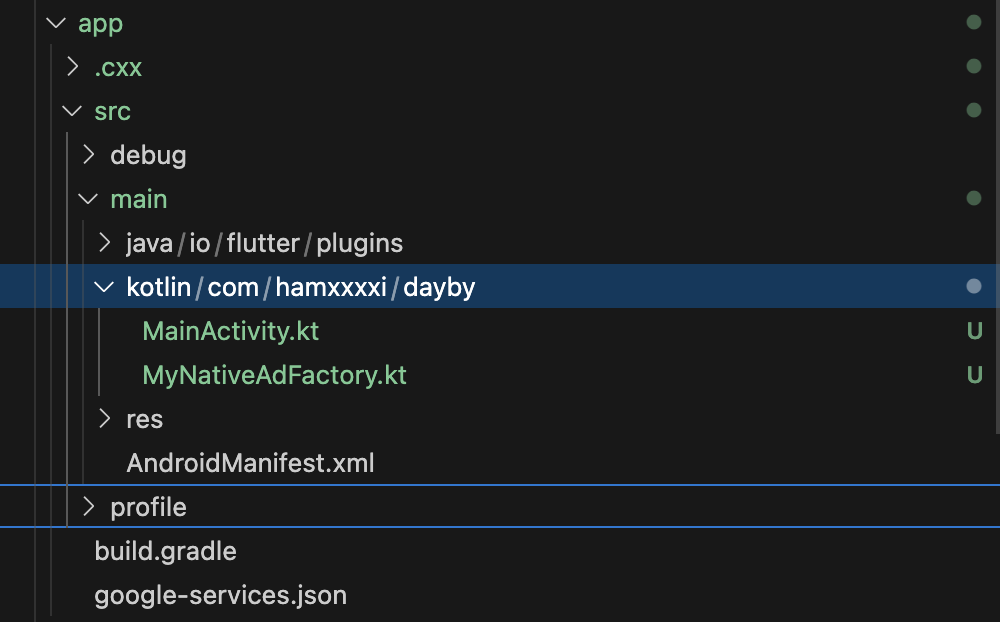
android/app/src/main/kotlin/com/hamxxxxi/dayby/MainActivity.kt
package com.hamxxxxi.dayby

import io.flutter.embedding.android.FlutterActivity
import io.flutter.embedding.engine.FlutterEngine
import io.flutter.plugins.googlemobileads.GoogleMobileAdsPlugin

// 略ios/Runner/Info.plist ※表示名なので大文字
<!-- 略 -->

	<key>CFBundleName</key>
	<string>Dayby</string>

<!-- 略 -->lib/firebase_options.dart
// 略

  static const FirebaseOptions ios = FirebaseOptions(
    apiKey: 'apiKey',
    appId: 'appId',
    messagingSenderId: 'messagingSenderId',
    projectId: 'projectId',
    storageBucket: 'storageBucket',
    androidClientId: 'androidClientId',
    iosClientId: 'iosClientId',
    iosBundleId: 'com.hamxxxxi.dayby',
  );

// 略ios/Runner.xcodeproj/project.pbxproj ※これは自動生成ファイル?その場合は修正不要
<!-- 略 -->

		xxx /* Profile */ = {
		  <!-- 略 -->
			buildSettings = {
        <!-- 略 -->
				PRODUCT_BUNDLE_IDENTIFIER = com.hamxxxxi.dayby;
				<!-- 略 -->
			};
			name = Profile;
		};
		xxx /* Debug */ = {
		  <!-- 略 -->
			buildSettings = {
        <!-- 略 -->
				PRODUCT_BUNDLE_IDENTIFIER = com.hamxxxxi.dayby.RunnerTests;
				<!-- 略 -->
			};
			name = Debug;
		};
		xxx /* Release */ = {
		  <!-- 略 -->
			buildSettings = {
        <!-- 略 -->
				PRODUCT_BUNDLE_IDENTIFIER = com.hamxxxxi.dayby.RunnerTests;
				<!-- 略 -->
			};
			name = Release;
		};
		xxx /* Profile */ = {
		  <!-- 略 -->
			buildSettings = {
        <!-- 略 -->
				PRODUCT_BUNDLE_IDENTIFIER = com.hamxxxxi.dayby.RunnerTests;
				<!-- 略 -->
			};
			name = Profile;
		};
		xxx /* Debug */ = {
		  <!-- 略 -->
			buildSettings = {
        <!-- 略 -->
				PRODUCT_BUNDLE_IDENTIFIER = com.hamxxxxi.dayby;
				<!-- 略 -->
			};
			name = Debug;
		};
		xxx /* Release */ = {
			<!-- 略 -->
			buildSettings = {
        <!-- 略 -->
				PRODUCT_BUNDLE_IDENTIFIER = com.hamxxxxi.dayby;
				<!-- 略 -->
			};
			name = Release;
		};

<!-- 略 -->Firebaseを導入していない場合はここまで!
ここから下はFirebaseを導入している方向けです。Firebaseを導入している場合、ここまでの変更のみでビルドすると以下のエラーが出ます。
FAILURE: Build failed with an exception.

* What went wrong:
Execution failed for task ':app:processDebugGoogleServices'.
> No matching client found for package name 'com.hamxxxxi.dayby'

* Try:
> Run with --stacktrace option to get the stack trace.
> Run with --info or --debug option to get more log output.
> Run with --scan to get full insights.
> Get more help at https://help.gradle.org.Firebaseに新しいパッケージ名を登録し、設定情報を書き換え(Firebaseを導入している場合のみ)
新たなアプリとしてFirebaseに登録
Firebaseの「プロジェクトの設定」画面の、「アプリの追加」から、新たなパッケージ名のAndroid/iOSアプリを作成。
画面左上の、青い歯車ボタンで「プロジェクトの設定」へ移動
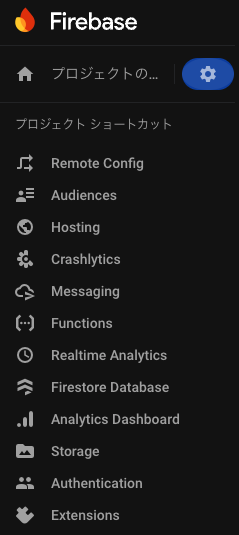
右上の「アプリの追加」ボタンで新たなアプリを作成
(色々作り直した関係ですでに大量に登録されてしまっているのを一掃する勇気が出ない)
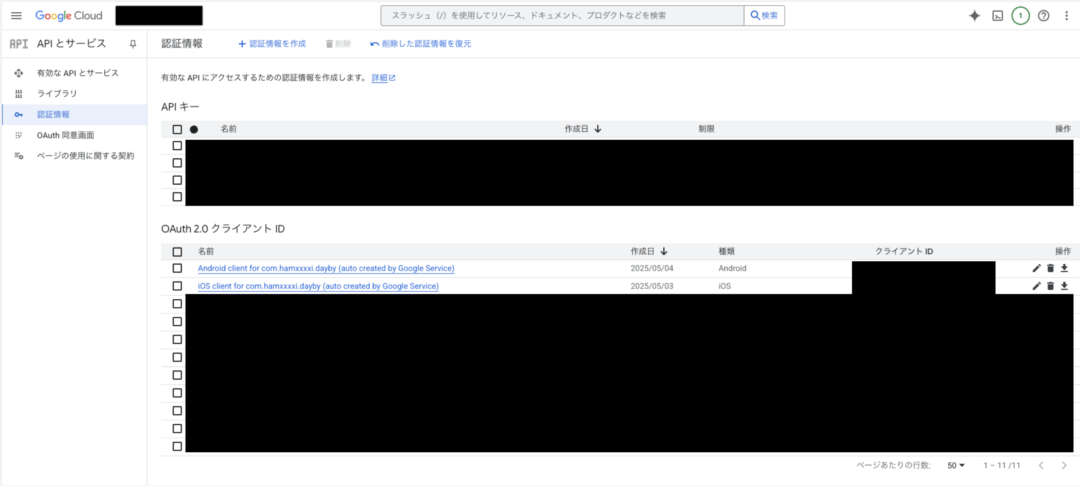
Google Cloudの認証情報を確認
FirebaseにiOSの新規アプリを追加すると、Google Cloudの認証情報に新たなクライアントが自動で登録されます。Androidは、SHA証明フィンガープリントを設定すると、同じように新たなクライアントが自動登録されますので、きちんとフィンガープリントを設定しましょう!
ということでGoogle Cloudのコンソールで認証情報が追加されているのを確認。Google Cloud側の操作は不要です。
Firebaseの設定ファイルを入れ替え
設定ファイルをFirebaseからダウンロードし、プロジェクト内の既存の同名ファイルと入れ替えます。
- android/app/google-services.json
- ios/Runner/GoogleService-Info.plist
※この時、「GoogleService-Info.plistのANDROID_CLIENT_ID」や「google-services.jsonの”client_id”(”ios_info”の記載がある部分の”client_id”)」が、最新のクライアントIDになっていないことがあります。(先にiOSアプリを作成→その後にAndroidアプリを作成した場合、iOSの設定ファイルに最新のAndroidアプリ情報が反映されない。という事象と推測。)この先の変更でこちらも書き換えますのでご安心を。
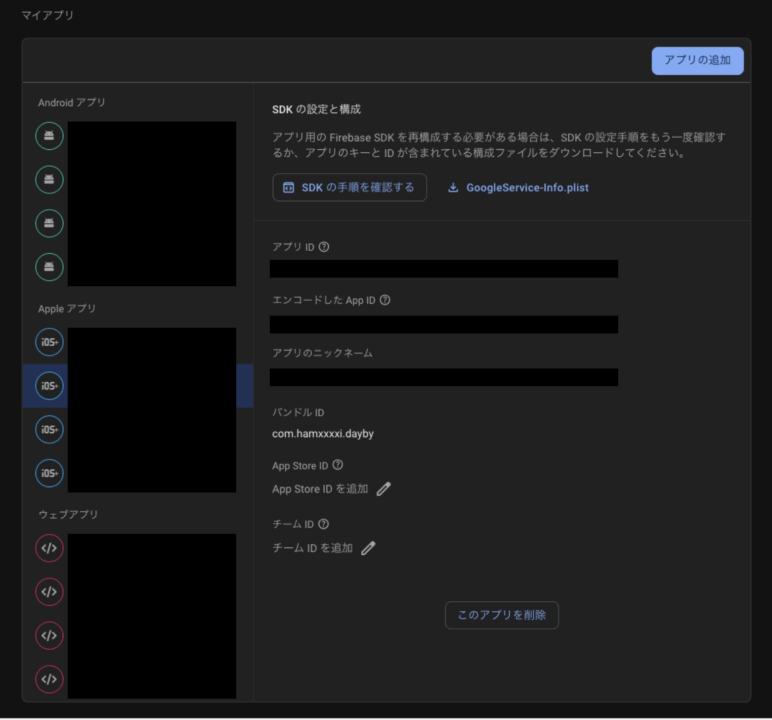
クライアントID・アプリIDの修正
ここからは、クライアントID(Google Cloudの認証情報を参照)・アプリID(Firebaseコンソールのマイアプリを参照)を修正していきます。今回作成した値になっているか確認しながら、修正していきます。エディタの置換機能を使って、古いクライアントID・アプリIDで検索し置換するのが良いと思います。
※flutterfire configure で修正できそうな気もするのですが、エラーになってしまうので手動で修正。一気に修正する方法ご存知でしたらコメントください🙃
firebase.json
{
    "flutter": {
        "platforms": {
            "android": {
                "default": {
                    "projectId": "projectId",
                    "appId": "1:xxx:android:xxx",
                    "fileOutput": "android/app/google-services.json"
                }
            },
            "ios": {
                "default": {
                    "projectId": "projectId",
                    "appId": "1:xxx:ios:xxx",
                    "uploadDebugSymbols": true,
                    "fileOutput": "ios/Runner/GoogleService-Info.plist"
                }
            },
            "dart": {
                "lib/firebase_options.dart": {
                    "projectId": "projectId",
                    "configurations": {
                        "android": "1:xxx:android:xxx",
                        "ios": "1:xxx:ios:xxx",
                        "web": "1:xxx:web:xxx"
                    }
                }
            }
        }
    },
    "firestore": {
        "rules": "firestore.rules"
    },
    "functions": [
        {
            "source": "functions",
            "codebase": "default",
            "ignore": [
                "venv",
                ".git",
                "firebase-debug.log",
                "firebase-debug.*.log",
                "*.local"
            ]
        }
    ]
}lib/firebase_options.dart
// 略

class DefaultFirebaseOptions {
  // 略

  static const FirebaseOptions android = FirebaseOptions(
    apiKey: 'apiKey',
    appId: '1:xxx:android:xxx',
    messagingSenderId: 'messagingSenderId',
    projectId: 'projectId',
    storageBucket: 'storageBucket',
  );

  static const FirebaseOptions ios = FirebaseOptions(
    apiKey: 'apiKey',
    appId: '1:xxx:ios:xxx',
    messagingSenderId: 'messagingSenderId',
    projectId: 'projectId',
    storageBucket: 'storageBucket',
    androidClientId: 'xxx-xxx.apps.googleusercontent.com',
    iosClientId: 'xxx-xxx.apps.googleusercontent.com',
    iosBundleId: 'com.hamxxxxi.dayby',
  );
}
}

// 略android/app/google-services.json
// 略
    {
      "client_info": {
        "mobilesdk_app_id": "1:xxx:android:xxx",
        "android_client_info": {
          "package_name": "com.hamxxxxi.dayby"
        }
      },
      "oauth_client": [
        {
          "client_id": "xxx-xxx.apps.googleusercontent.com",
          "client_type": 1,
          "android_info": {
            "package_name": "com.hamxxxxi.dayby",
            "certificate_hash": "certificate_hash"
          }
        },
        // 略
      ],
      "api_key": [
        {
          "current_key": "current_key"
        }
      ],
      "services": {
        "appinvite_service": {
          "other_platform_oauth_client": [
            {
              "client_id": "xxx-xxx.apps.googleusercontent.com",
              "client_type": 2,
              "ios_info": {
                "bundle_id": "com.hamxxxxi.dayby"
              }
            }
          ]
        }
      }
    }
// 略ios/Runner/GoogleService-Info.plist
<!-- 略 -->

  <key>ANDROID_CLIENT_ID</key>
  <string>xxx-xxx.apps.googleusercontent.com</string>

<!-- 略 -->

	<key>GOOGLE_APP_ID</key>
	<string>1:xxx:ios:xxx</string>

<!-- 略 -->ios/Runner/Info.plist
<!-- 略 -->

	<key>CFBundleURLTypes</key>
	<array>
		<dict>
			<key>CFBundleTypeRole</key>
			<string>Editor</string>
			<key>CFBundleURLSchemes</key>
			<array>
				<string>com.googleusercontent.apps.xxx-xxx</string>
			</array>
		</dict>
	</array>

<!-- 略 -->

  <key>GIDClientID</key>
	<string>xxx-xxx.apps.googleusercontent.com</string>

<!-- 略 -->ios/firebase_app_id_file.json
{
  "file_generated_by": "FlutterFire CLI",
  "purpose": "FirebaseAppID & ProjectID for this Firebase app in this directory",
  "GOOGLE_APP_ID": "1:xxx:ios:xxx",
  "FIREBASE_PROJECT_ID": "FIREBASE_PROJECT_ID",
  "GCM_SENDER_ID": "GCM_SENDER_ID"
}いざビルド!
無事起動しました!
ちなみに、「Firebaseの設定ファイルを入れ替え」「クライアントID・アプリIDの修正」あたりに不備があると、Firebase系のサービスが反応しません。例えば、Googleログインのボタンや画面遷移は動くのですが、処理が完了しない状態になります。エラーを吐かないのでハマりかけました。
(サインインのポップアップはでるが、ログインしてもまたこの画面に戻ってしまう)
お疲れ様でした!最初からアプリ名が決まっていれば良いですが、何かとパッケージ名変更は起こりそうなものです。書き換えるファイルは多いですが、エディタで一発置換すれば済むものばかりなので、着実にこなして終わらせましょう〜☺️

コメント